
The highest-performing teams in Wuthering Waves rely on a strict three-character framework: one Main DPS, one Sub-DPS, and one Support or Healer, or a single hypercarry backed by two damage amplifiers. Clearing endgame modes like the Tower of Adversity for all 30 crests requires precise rotation sequencing, such as stacking universal team buffs before passing single-target Outro skills, while managing a 10-Vigor limit per tower across at least three capable damage dealers.
Core framework: The three-slot Concerto engine
Rather than running uncoordinated carries, effective team building in Wuthering Waves centers on Concerto Energy management. MisterMenPlays defines the standard party structure across three dedicated slots:
- Main DPS: Occupies the field during primary burst windows to consume buffs and deal direct damage.
- Sub-DPS: Fills short field windows to charge their Concerto gauge, deals off-field or burst damage, and casts an Outro Skill tailored to the carry's damage profile.
- Support/Healer: Sustains party survivability, equips supportive Echo sets, and supplies team-wide damage amplification.
Hypercarry setups modify this baseline by swapping the secondary damage dealer for another offensive buffer. Across both models, peak damage output requires triggering Intro and Outro skills precisely at full Concerto Energy.

60 Lunites
 60 LunitesUSD 0.77Buy Now
300+30 Lunites
300+30 LunitesUSD 3.77Buy Now980+110 Lunites
980+110 LunitesUSD 11.18Buy Now1980+260 Lunites
1980+260 LunitesUSD 22.29Buy Now3280+600 Lunites
3280+600 LunitesUSD 36.90Buy Now6480+1600 Lunites
6480+1600 LunitesUSD 72.53Buy NowLunite Subscription
 Lunite SubscriptionUSD 3.77Buy Now
Meta team compositions overview
The following lineups represent the primary meta configurations documented across community clears and guides:
| Team Comp | Role Breakdown | Primary Synergy & Notes |
|---|---|---|
| Camellya Hypercarry | Camellya (Main DPS) + Sanhua (Sub-DPS) + Shorekeeper (Support/Healer) | Shorekeeper stacks team sustain and Crit Rate; Sanhua supplies a 38% Basic Attack Deepen via Outro (MisterMenPlays). |
| Jiyan Heavy Attack | Jiyan (Main DPS) + Mortefi (Sub-DPS) + Verina or Shorekeeper (Support/Healer) | Mortefi boosts Heavy Attack damage and launches coordinated off-field Marcato strikes (MisterMenPlays). |
| Jinhsi Coordinated Burst | Jinhsi (Main DPS) + Yinlin or Zhezhi (Sub-DPS) + Verina (Support/Healer) | Coordinated off-field attacks quickly accumulate Incandescence stacks for Jinhsi's enhanced skill (MisterMenPlays). |
| Starter F2P Comp | Rover or Chixia (Main DPS) + Yangyang (Sub-DPS) + Baizhi (Support/Healer) | Accessible free setup where Yangyang aids grouping and energy generation while Baizhi triggers team buffs (MisterMenPlays). |
Camellya hypercarry: Basic attack amplification
Camellya funnels the bulk of her damage through Basic Attack multipliers. Unlocking her full damage ceiling requires running her alongside Sanhua and Shorekeeper, as outlined in MisterMenPlays' Camellya build guide.
Shorekeeper (Liberation + Concerto)
  └──> Intro to Sanhua (Build Concerto)
        └──> Outro to Camellya (Blossom/Budding Burst Window)
Shorekeeper opens the sequence. She builds Concerto Energy and casts her Resonance Liberation to establish the Stellarrealm. Swapping to Sanhua triggers Sanhua's Intro Skill inside the zone.
Sanhua executes her quick skill combo to fill her Concerto gauge. Her Outro Skill grants a 38% Basic Attack DMG Deepen for 14 seconds—applied exclusively to the immediate next incoming Resonator.
Camellya enters on Intro, takes the 38% deepen, and alternates between Blossom and Budding modes while consuming Crimson Buds. She cannot swap out mid-combo: the moment she leaves the field, Sanhua's Outro buff immediately terminates.
Shorekeeper and the 37.5% Critical Rate ceiling
Unlike static healers, Shorekeeper scales through a tiered Resonance Liberation field. Mechanics documented by Shacknews show that her field advances as Intro Skills trigger within its perimeter:
- Outer Stellarrealm: Basic stage that provides continuous healing to active party members.
- Inner Stellarrealm: Triggered by the first Intro Skill swap; provides up to a 12.5% Critical Rate increase, scaled at 0.01% per 0.2% Energy Regeneration.
- Supernal Stellarrealm: Triggered by the second Intro Skill swap; provides an additional Crit Rate increase up to 25%, scaled at 0.01% per 0.1% Energy Regeneration.
A completed rotation gives the third Resonator up to a combined 37.5% Critical Rate boost before Discernment ends the field. Maxing both tiers requires heavy Energy Regeneration investment on Shorekeeper.
Jiyan and Mortefi: Heavy attack synergy
Jiyan deals sustained Heavy Attack damage during his enhanced state, making Mortefi his highest-value 4-star partner (Game Rant).
Mortefi generates Concerto Energy quickly. His Outro Skill applies an amplification buff explicitly for Heavy Attack damage, directly feeding Jiyan's primary multiplier.
Cast Mortefi's Resonance Liberation before passing the field. This triggers off-field coordinated Marcato attacks on every strike Jiyan lands. At sixth Resonance Chain (S6), Mortefi adds a 20% team-wide ATK buff on top of the Heavy Attack amplification.
The sequencing rule: Universal vs. targeted Outro buffs
Mishandling swap order wipes out key damage bonuses. The core combat rule rests on how universal team buffs interact with single-target handoffs, as detailed by Game Rant.
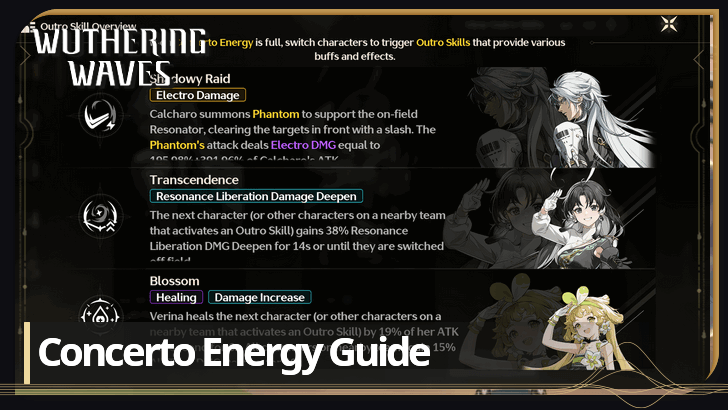
Verina's Outro Skill grants a 15% All-Type Damage Deepen to all team members for 30 seconds. This buff applies team-wide and persists through character swaps.
Sanhua's Outro Skill applies a 38% Basic Attack DMG Deepen for 14 seconds only to the immediate next incoming Resonator. Swapping that Resonator out early dispels the buff instantly.
To stack both multipliers simultaneously: 1. Complete your support's rotation (such as Verina) to cast their Outro Skill. 2. Swap into your Sub-DPS (such as Sanhua) to inherit the team-wide buff and build Concerto. 3. Trigger the Sub-DPS Outro Skill directly into your Main DPS.
Your carry enters the field with both the 15% all-type deepen and the 38% basic attack deepen running concurrently.
Tower of Adversity Hazard Zone: Vigor and roster planning
Tower of Adversity Hazard Zone demands strict resource planning across separate stages. Data from WutheringWaves.gg confirms that achieving a full 30-crest clear requires a minimum roster of:
- 3 well-invested Main DPS units
- 2 Sub-DPS units
- 1 to 2 Support units
Every Resonator is bound by a 10-Vigor limit per tower. A single team cannot clear an entire tower without exhausting its stamina budget. Clear stages 1 and 4 with your primary carries, and clear stages 2 and 3 with secondary teams.
Gear mechanics provide an operational loophole: Echoes and weapons do not lock upon clearing a floor. Strip your 5-star weapon and main Echo set from your first carry and equip them directly onto your second carry for the subsequent floor.
Supports require minimal resource investment. A budget support unit handles high-tier towers with a Bell-Borne Geochelone Echo and a 5-piece Rejuvenating Glow set to trigger healing and team buffs.
Discrepancies in Tower documentation
Guides show conflicting structural reports regarding the Hazard Zone. WutheringWaves.gg details the mode as three distinct towers (Resonant Tower, Echoing Tower, and Hazard Tower) governed by the 10-Vigor cap to earn 30 total crests. Earlier reference materials describe a 10-floor structure featuring two halves per floor requiring two static three-character teams. Active Hazard Zone progression runs on the three-tower Vigor allocation model.
Hologram Calamity encounters: Single carry prioritization
Tower of Adversity rewards clear speed against mob waves, but Tactical Hologram Calamity fights require the inverse approach. HostedGG documents that Hologram bosses feature lethal damage scaling, relentless attack strings, and narrow dodge-counter windows.
Running dual-DPS teams with extended on-field cycles is dangerous in high-tier Holograms. Long attack animations leave Sub-DPS characters vulnerable to lethal hits.
Focus full investment into a single hypercarry backed by an Outro buffer. Evade incoming boss strings, build Concerto during safe recovery frames on the support, and dump your burst during stagger windows.
Meta evolution across patches
Character rankings continue to shift across patch cycles documented between Version 1.0 and Version 3.6:
- Versions 1.0 through 1.4: Meta strategies established core setups around Jiyan, Yinlin, Jinhsi, Shorekeeper, and Camellya.
- January 2025 updates: Guides documented the introduction of characters like Carlotta, Phoebe, and Zani.
- Later patch data (v3.4 to v3.6): Documentation lists newer units including Hiyuki, Lucilla, Cartethyia, and Chisa.
Regardless of roster expansion, the core mechanical principle remains fixed: maximize Outro damage deepen multipliers and match them to your carry's primary damage type.
Players planning convenes for these carries can acquire Astrite directly or convert Wuthering Waves Lunite to obtain limited-banner Resonators and their signature weapons.
Frequently asked questions
Can equipment and Echoes be swapped between Resonators during Tower of Adversity runs?
Yes. Weapons and Echoes are not locked after completing a stage in the Tower of Adversity. You can freely transfer optimized gear sets across different Resonators between stages to reduce overall farming requirements (WutheringWaves.gg).
Why should support Outro skills be activated before sub-DPS Outro skills in standard rotations?
Universal support buffs like Verina's 15% All-Type Damage Deepen apply to all party members for 30 seconds, whereas targeted buffs like Sanhua's 38% Basic Attack DMG Deepen only apply to the immediate next incoming character and expire upon swapping. Rotating Support into Sub-DPS and finally into the Main DPS ensures both damage multipliers remain active simultaneously on the carry (Game Rant).
How does Shorekeeper's Stellarrealm boost team Critical Rate?
Shorekeeper's Resonance Liberation creates an Outer Stellarrealm that upgrades to an Inner Stellarrealm (up to 12.5% Crit Rate) and then a Supernal Stellarrealm (up to 25% Crit Rate) through sequential Intro Skills. Based on her Energy Regeneration, this provides up to a combined 37.5% Critical Rate buff to the third character in the rotation (Shacknews).

Comments