Master your weekly Eye of Eden solo run with safe rock timing, Krill evasion tactics, and the optimal statue sacrifice route for all 15.75 candles.
Running Eden alone can feel like throwing hard-earned wings into a meat grinder. Between rogue rock showers, patrolling Dark Dragons, and relentless headwinds, one mistimed step knocks half a dozen lights out of your back before you even reach the final gate.
Surviving alone does not require movement glitches or a hand-holding squad. It demands patience, disciplined positioning, and an ear for rock cycles. Here is how to clear the gauntlet, reach the Point of No Return intact, and secure all 15.75 Ascended Candles before the storm takes you.
Pre-Run Checklist: Winged Light Thresholds and Prop Loadouts
Do not enter unprepared.
The stone gateway requires 20 Winged Light to open—a bare entry fee, not a survival recommendation. Attempting Eden with 20 lights guarantees pocket change; walking through red rain in the final zone burns cape energy on its own. Enter with at least 50 to 70+ Winged Light. If you have completed multiple rebirths, entering with 90 to 120+ provides the cushion needed to reach the deepest statues.
Equip a deployable light prop before stepping through the door. Solo runners have no partners to honk and recharge them. An item like the Season of Assembly torch or the Remembrance tea set serves as an on-demand recharge station behind any rock wall, refilling cape energy in seconds while you wait out hazards.
Check your totals on the map before launching. Since patch 32.0, you can pull up the Sky Map anywhere—press M on keyboard, or pull the trigger and hit D-pad down on controller—without visiting physical Map Shrines to track down missing stars.
The table below details the baseline numbers you should know before stepping into the staging grounds.
| Eden Parameter | Requirement or Value | Gameplay Impact |
|---|---|---|
| Entry Gate Threshold | 20 Winged Light | Hard lock on the entryway door. |
| Recommended Buffer | 50 to 70+ Winged Light | Gives sufficient health to survive debris and light deep statues. |
| Statue Sacrifice Ratio | 4 Statues : 1 Ascended Candle | Every statue takes 1 Winged Light; 4 deposits yield 1 full candle. |
| Maximum Storm Statues | 63 Statues | The definitive total available across the final sacrifice grounds. |
| Maximum Weekly Return | 15.75 Ascended Candles | Payout awarded if you successfully offer light to every statue. |
| Weekly Reset Schedule | Sunday 00:00 PST / UTC-8 | All 63 statues refresh and can receive light once again. |
Entering Eden with at least 50 Winged Light ensures you survive the climb and hit the 4-to-1 sacrifice ratio deep into the final storm.

Sky: Children of the Light
15 Season Candles
 15 Season CandlesUSD 4.67Buy Now
15 Season Candles
15 Season CandlesUSD 4.67Buy Now30 + 5 Bonus Season Candles
30 + 5 Bonus Season CandlesUSD 8.87Buy Now60 + 12 Bonus Season Candles
60 + 12 Bonus Season CandlesUSD 18.29Buy Now150 + 40 Bonus Season Candles
150 + 40 Bonus Season CandlesUSD 41.89Buy Now
Bypassing the First Rock Storm: Valley Drops and Audio Cues
Red rocks define the opening ascent. As you climb the initial steps, a long stone bridge spans a wind-swept gap where debris slams the masonry in heavy waves. Crossing this bridge up top is a trap.
Drop into the valley gap directly underneath instead. The chasm floor blocks projectile arcs entirely, letting you walk beneath the bridge and scramble up the far slope without dropping energy.
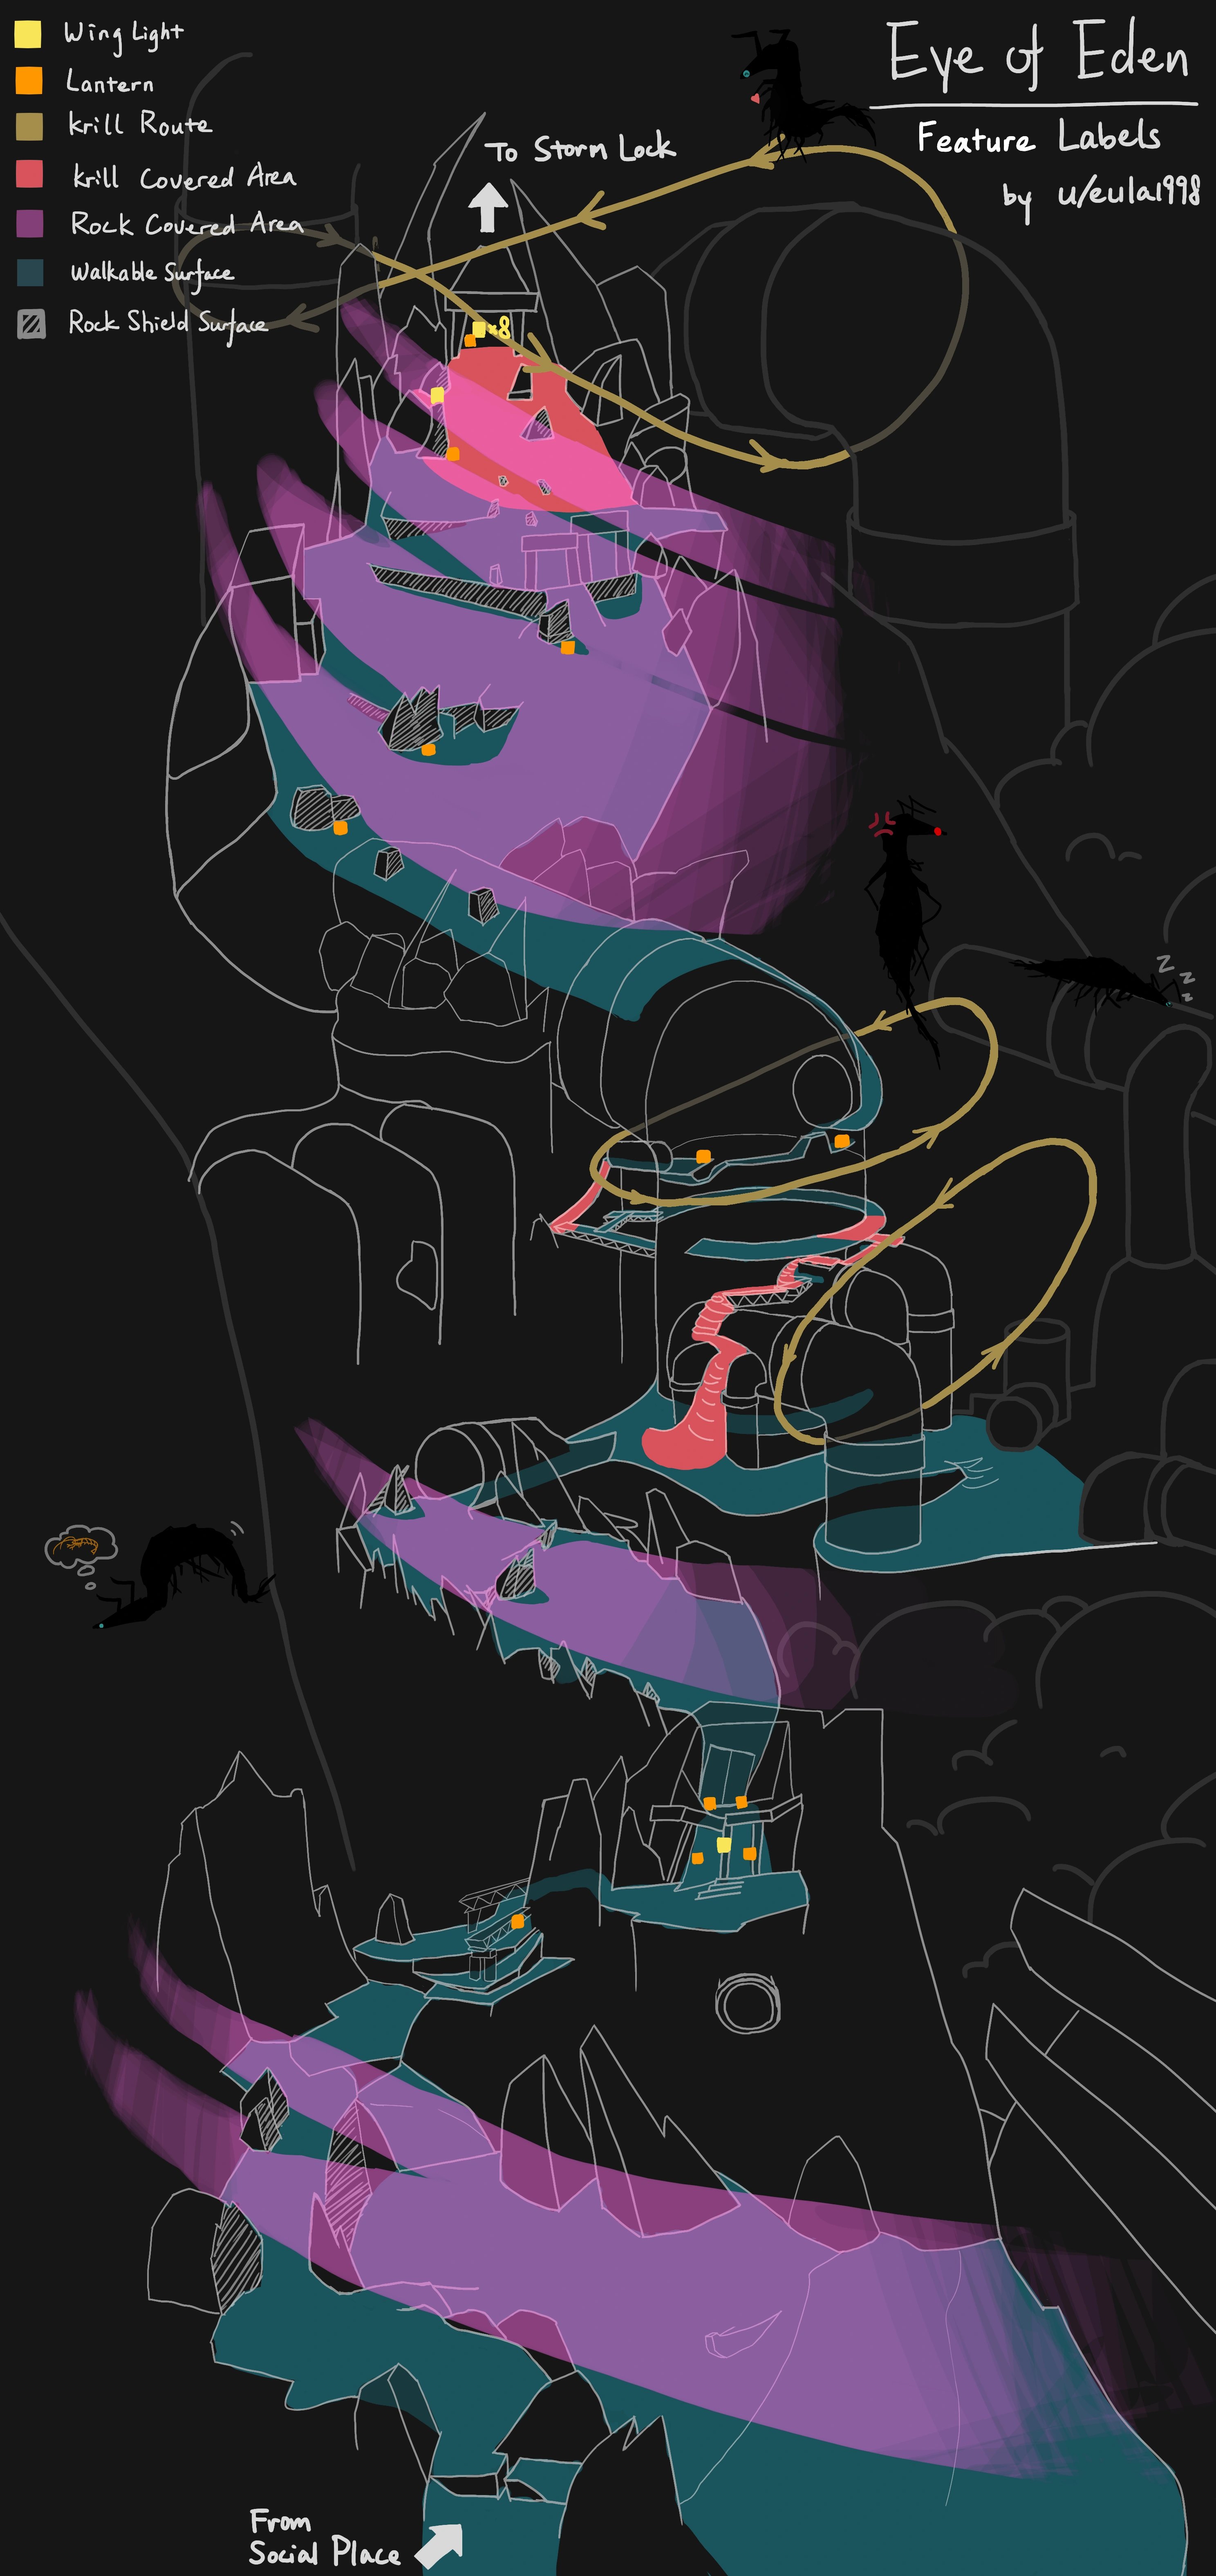
Once out of the trench, you face intermittent rock paths between stone shelters. Never guess when a volley ends—listen for the audio cue. Each rock wave starts with a sharp strike sound resembling a match lighting or pneumatic release, sounding seconds before impacts hit the ground.
Lock behind cover when you hear that strike. Wait until debris shatters against your barrier and the noise subsides, then sprint immediately to the next boulder.
If you take a direct hit, never turn around to chase dropped Winged Light. Rocks hit on a fixed tempo; doubling back means the next wave strikes while you crawl, costing three more lights. Accept the initial loss and duck into the nearest alcove immediately.
How to Avoid Krill in Eden Along the Pipeline Path
Broken masonry and rusted pipes mark the mountain's midsection: the Dark Dragon zone. Flying debris and Krill patrol paths overlap here, turning a vertical climb into a test of patience.
A single Dark Dragon flies a predictable oval circuit through this corridor. Its blue spotlight cuts across the central staircase and the platforms below the upper cave.
Three hard rules keep you alive here:
- Stay Grounded in Heavy Air: Do not fly upward except across short ledge jumps. Headwinds stall vertical flight, draining cape energy and stranding you in the Krill searchlight.
- Use Pipe Geometry for Blindspots: Large rusted pipes along the route break line-of-sight completely. If the searchlight turns red, drop straight into the hollow opening of a pipe or press flush against its convex outer curve.
- Clear the Upper Stairs on a Fresh Cycle: The final staircase before the shelter tunnel sits exposed to spotlight sweeps and boulders alike. Wait behind the lower stone wall until the Krill turns its back and moves down the mountain. Once the light clears and a rock volley ends, sprint up the stairs.
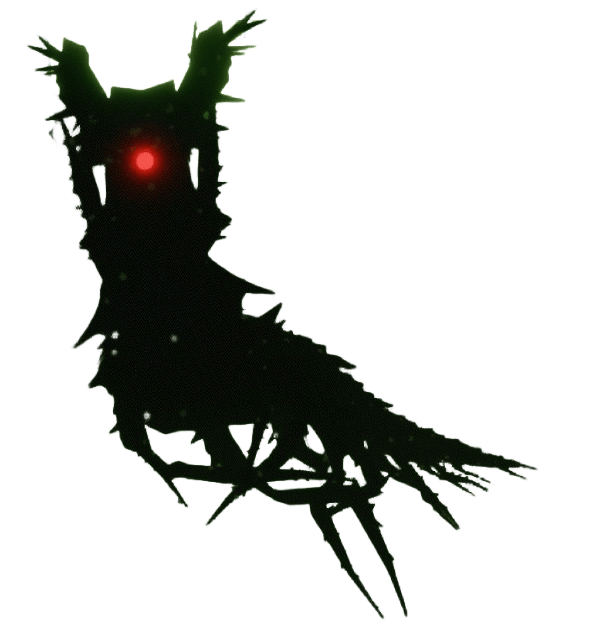
Do not count on outdated exploits. Early guides recommended home-warp menu tricks to dodge Krill strikes or stone damage, but developer updates patched those loopholes out. Break line-of-sight with physical geometry; opening menus will only leave you smashed.
Inside the Final Cavern: Gathering the Last 10 Wings
The upper pipeline tunnel empties into a quiet, sheltered cavern. Take a breath. No rocks can hit you here, and Dark Dragons cannot enter. This is your staging area for the endgame.
Stationary braziers line the path alongside 10 Winged Light children. Pick up every single child. These 10 lights act as guaranteed sacrifice tokens in the storm, balancing out hits taken on the climb.
At the cavern's end stands a glowing archway: the Point of No Return.
Approaching the arch triggers a confirmation dialogue. Stepping past it locks your game state permanently. Returning home via the menu is disabled, and force-closing the app simply reloads you inside the storm until your light is spent and the rebirth sequence begins.
Recharge fully and ready your props before crossing. If you plan to grab extra cosmetics, seasonal items, or instrument packs before your next cycle, you can check Sky: Children of the Light top-up options to stock up before you enter the final sacrifice chamber.
The Storm Sacrifice Route: Mapping All 63 Statues
The threshold dumps you straight into the storm. Constant red rain slowly bleeds cape energy, while red rocks pummel the terrain in cyclical barrages. Your objective is no longer survival. Your objective is distribution.
Every statue you touch accepts 1 Winged Light. For every 4 statues you activate, you earn 1 Ascended Candle upon rebirth.
While older community posts estimated 60 to 70 statues yielding around 15.5 Ascended Candles, rigorous counting confirms there are exactly 63 statues. That sets a hard mathematical ceiling of 15.75 Ascended Candles per weekly reset.
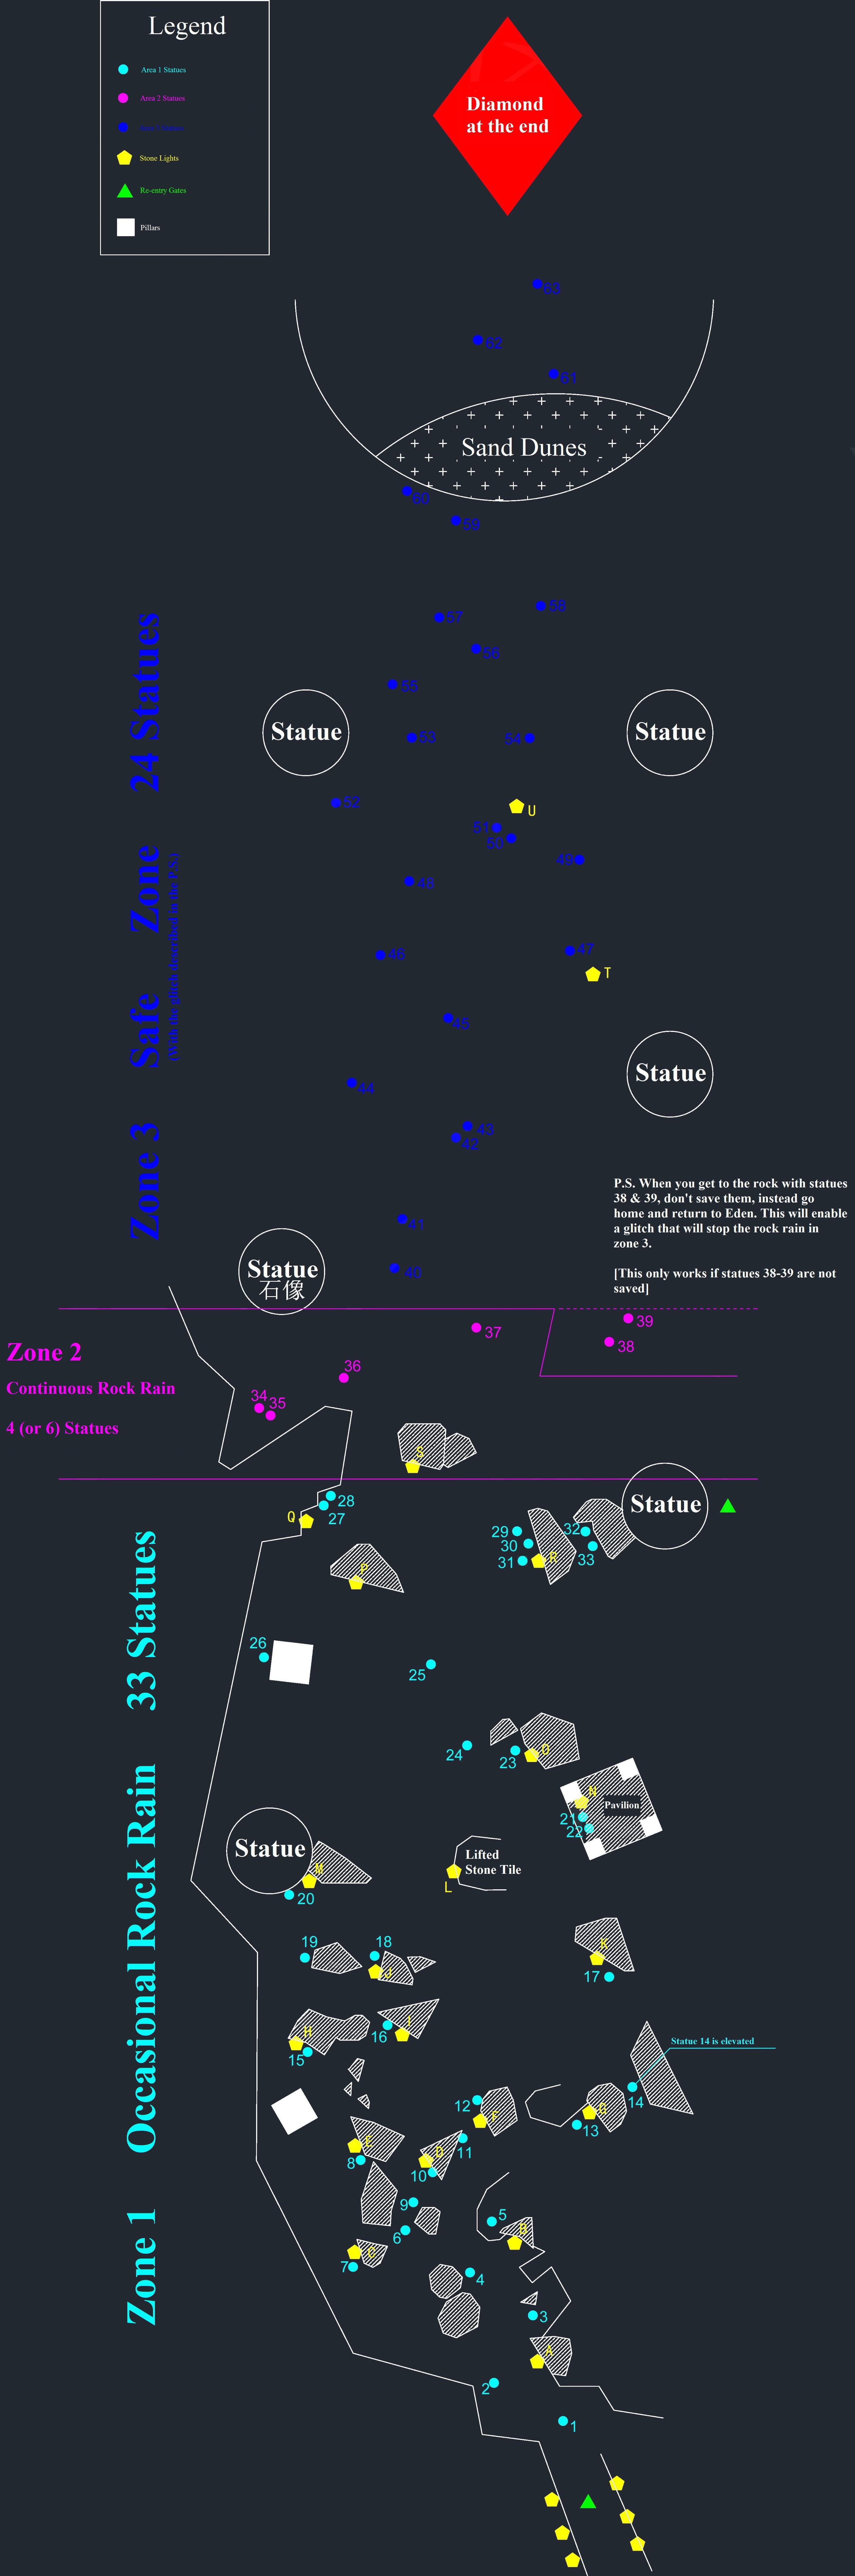
To maximize your returns before you collapse, follow this strict 5-stage sacrifice route:
- Clear the First Trench: Initial statues sit behind low stone walls. Light the braziers along this trench first. Move statue to statue, offering light while staying sheltered from the rock waves.
- Sweep the Left Sandbanks: As the path opens up, scan the left wall. Several statues sit tucked into small recesses. Always light statues located behind protective geometry before stepping into open flatland.
- Cross to the Right Ridge: After clearing the left side, time the rock shower and cross to the right-hand ridge. Clusters of statues sit near temporary light sources. Drop your deployable brazier here if your cape hits zero.
- The Continuous Rock Line: Past the halfway point, stone shelters disappear. Rock showers merge into a near-continuous barrage. Do not try to dodge. Pick a direct line through the center statues, tapping the hand icon to offer light while pushing through the hail.
- The Final Mountain Approach: The deepest statues sit in the red dust directly beneath the eye of the mountain. You will lose light rapidly here. Crawl forward relentlessly, hitting every unlit statue you can reach until your final light extinguishes.
The breakdown below shows how statues are distributed across the storm terrain and how much each sector contributes to your weekly candle haul.
| Storm Sector | Statue Count | Hazard Environment | Potential Candle Yield | | :--- | :--- | :--- | | Phase 1: Covered Trench | 13 Statues | Intermittent rock showers with solid stone walls. | 3.25 Candles | | Phase 2: Central Sandbank | 18 Statues | Wider gaps between cover; occasional rain drain. | 4.50 Candles | | Phase 3: The Broken Dunes | 19 Statues | Sparse cover; high wind knockback; rapid rock waves. | 4.75 Candles | | Phase 4: The Endless Hail | 13 Statues | No cover; non-stop red rock bombardment; zero flight. | 3.25 Candles | | Full Clear Total | 63 Statues | Cumulative Storm Zone | 15.75 Candles |
Clearing the protected statues in Phases 1 and 2 secures nearly half your weekly candle cap before you ever step into the continuous rock line.
Essential Solo Movement Tech for Heavy Headwinds
Gale-force headwinds knock your Sky child backward if you jump into the air. Running normally through the sand feels slow, and standard jumping catches the wind like a sail, shoving you backward several feet.
Counter this knockback with screen-flick skips. Instead of holding down your directional circle and tapping jump, flick your movement screen in your intended direction without locking the stick forward. This triggers short directional skips that hug the ground contours, tracking your landing spots cleanly while ignoring headwind resistance.
Surface sliding is another critical tool. Whenever you move down an incline or across smooth rock slabs, drop into a slide. Sliding carries forward momentum under the wind barrier, allowing you to cover distance between statues without consuming cape energy.
Finally, use the level-one faint emote. When you are caught behind a low ledge where rock shards can still clip your head, trigger the level-one faint emote. Your character collapses flat against the ground, instantly shrinking your hitbox below the ledge profile and canceling impact stagger from passing debris.
If you find yourself short on cosmetics or need additional equipment before your next mountain attempt, exploring Sky: Children of the Light candles and passes can help keep your cosmetic collection moving while you focus your weekly runs on Ascended Candles.
Ascended Candle Economy and Orbit Constellation Upgrades
Once your final light fades, your character enters the rebirth sequence, transitioning through the starry expanse to the Orbit constellation altar. Here, your sacrifices materialize into Ascended Candles.
Ascended Candles fund two vital functions: unlocking friendship trees with other players and purchasing Wing Buffs from regular and seasonal spirits.
Purchasing a Wing Buff (represented by a winged lock icon on a spirit's constellation tree) costs between 1 and 4 Ascended Candles. Every Wing Buff you unlock permanently awards 1 additional Winged Light each time you are reborn. Instead of waking up at Home with a single light, an experienced player with unlocked Wing Buffs steps out of rebirth with 50, 70, or even 100+ permanent Winged Light immediately credited to their cape.
The following table outlines the upgrade costs and permanent light gains available through the Orbit constellation.
| Spirit Upgrade Tier | Ascended Candle Cost | Permanent Light Awarded | Strategic Priority |
|---|---|---|---|
| Tier 1 Standard Wing Lock | 1 Candle | +1 Permanent Winged Light | Highest priority; cheapest path to higher cape wedges. |
| Tier 2 Advanced Wing Lock | 2 Candles | +1 Permanent Winged Light | Solid value across core constellation spirits. |
| Tier 3 Elite Wing Lock | 3 Candles | +1 Permanent Winged Light | Mid-tier investment for complete constellation progress. |
| Tier 4 Elder / Complex Lock | 4 Candles | +1 Permanent Winged Light | High-cost locks reserved for elder hair and end-tree items. |
Investing Ascended Candles into 1-candle and 2-candle wing locks provides the fastest route to expanding your starting cape wedges after rebirth.
Prioritize unlocking the 1-candle and 2-candle wing locks across your standard constellation spirits first. Spreading your earnings across low-cost locks builds your starting wing pool much faster than saving up 4 candles for a single deep branch.
Alternative Ascended Candle Sources and Mid-Week Cleanups
A botched run does not lock you out of your weekly payout.
Eden tracks your progress per individual statue, not as a blanket stage completion. The 63 statues reset every Sunday at midnight PST (00:00 PST/UTC-8 or PDT/UTC-7 during Daylight Saving Time). If you only reached 40 statues on your first run, the 23 statues you missed remain active. You can collect your scattered Winged Light across the kingdoms and run Eden a second time in the same week. The statues you already lit will stand dark and inert, but the 23 unlit statues will still accept your light.
If running Eden multiple times sounds exhausting, look out for Strong Shard Eruptions. Red shard falls occur every other day in rotating zones across the kingdoms. Clearing a Strong Shard event rewards 2 to 3 Ascended Candles upon clearing the dark plants and memory sequence—no rebirth required.
Between one solid Eden run yielding 12 to 15 candles and three red shard clearings during the week, you can easily pull in over 20 Ascended Candles every reset.
If you want to secure seasonal progression or top up your account without falling behind on weekly routines, reviewing Sky: Children of the Light purchase packages can keep your inventory stocked while you master your weekly route.
Frequently Asked Questions
When does the Eye of Eden reset for the week?
Eden resets every Sunday at 00:00 PST (or 00:00 PDT during Daylight Saving Time). At this exact moment, all 63 statues across the final storm refresh and can accept Winged Light sacrifices once again.
Can I run Eye of Eden a second time in the same week if I missed statues?
Yes, statue completion is tracked individually rather than locking the entire area. Any statues you lit on your first attempt remain empty, but any statues you missed can be lit on a subsequent run before the Sunday reset.
How many Ascended Candles can I get from one full Eden run?
A flawless full clear rewards 15.75 Ascended Candles by offering light to all 63 statues. Every four statues you successfully donate to yields exactly one Ascended Candle upon reaching Orbit.
How do I avoid getting knocked backward by heavy wind in Eden?
Avoid standard jumping, which allows headwinds to catch your character model and blow you backward. Use directional screen-flick skips or surface sliding to maintain ground contact and push through strong wind barriers.
What should I do if I lose Winged Light during a rock shower?
Never chase dropped light into active debris zones. Move forward to the nearest solid cover or deploy a recharge prop immediately, as turning back under falling rocks causes compounding light loss.
Can I leave the Eye of Eden once I reach the statue area?
No, stepping past the Point of No Return binds your character to the storm until all your Winged Light is extinguished. Teleporting home is disabled, and reloading the game will merely place you back into the storm until you complete the rebirth sequence.
Verdict on Solo Eden Pushes: Speed Versus Perfection
Chasing a perfect 63-statue clear every single Sunday is an unnecessary headache.
The final cluster of statues sits deep in the continuous hail, where the storm drains your energy almost instantly. Pushing for 63 instead of settling for 55 to 58 is usually the difference between a controlled, relaxed sacrifice and a frustrating crawl.
Hit your weekly reset with at least 60 wings, stick to the lower bypass paths, and carry a reliable recharge prop. If you clear the first two phases cleanly, you guarantee yourself 12 to 14 Ascended Candles with minimal stress. Treat the deep storm statues as a bonus, take your rebirth light, and build your permanent cape wedges one Sunday at a time.

Comments